Showing posts with label OS Install. Show all posts
Write by rohit-mahatara.blogspot.com | 0 comments

How to Install & Run Windows on a Mac with Boot Camp


BootCamp Assistant is an application made by Apple that makes it easy to install and run Windows on a Mac.  It’s not absolutely necessary to use the BootCamp Assistant however it does somewhat simply the process. It does this by automatically creating a separate partition on your hard drive and then uses that partition to run Windows on the Mac. The steps taken by BootCamp to install Windows on a Mac can also all be accomplished by using Disk Utility so we’ll go through both methods.


Understanding the Basics


understand learn how to run windows on a mac with bootcamp
Understand BootCamp

BootCamp Assistant does two things, it downloads all the drivers necessary for Windows to operate properly and makes it easy to partition your hard drive into 2 partitions. One partition will be used by your Mac to run Mac OS X and the other partition will be used to run Windows.
Basically what the drivers do, is allow your built-in camera, special keyboard function (like volume), magic mouse and trackpad to work properly. For example, without the drivers, when you press the volume button on your Apple keyboard it won’t do anything because there are no driver to tell Windows what that button does. The Windows support drivers should be installed even if you don’t plan on using the built-in camera or any of the other Apple hardware. It basically helps your Mac run Windows properly.
Next, why do I have to make a new partition to install Windows? Well the reason is that Windows and Mac don’t run on the same format. Macs run on Mac OS X (Journaled) and Windows runs on NTFS. Partitioning splits your hard drive into 2 separate sections, each with its own format. This means that your Mac will continue to run on Mac OS X (Journaled) and Windows will be able to run on NTFS. Think of it this way, the soon to be roommates both live in the same house but each get their own room customized to their own liking.
It’s not necessary to use BootCamp Assistant since it can all be done with Disk Utility, however I’ll go through that at the bottom of this article.

Preparing your Hard Drive with BootCamp

install windows on mac with bootcamp without bootcamp
Partition with BootCamp
Whenever you do anything to modify the hard drive you should alwaysmake a backup first; it’s very unlikely that something will go wrong but best be on the safe side. After making a backup, open BootCamp, it can be found in the Applications/Utilities folder or by searching for it in spotlight.
Here you will see the options that allows you to “Download the latest Windows support software from Apple” and “Install Windows 7 or later version”.
Lets handle downloading the latest Windows support software first. BootCamp assistant wants you to download the support drivers directly onto a properly formatted USB flash drive. If you go this route, your USB drive has to be formatted as MS-DOS (FAT), this is because Windows can not read the default Mac format. It’s not necessary to go this route as the support drivers can be downloaded directly from the Apple website, even after you’ve installed Windows on your Mac.  I’ve already covered how to format a drive, read the guide here if needed: Formatting a Drive
If you’d rather skip this step, just uncheck “Download the latest Windows support software from Apple”. Once you’ve got Windows installed on your Mac, it can be downloaded from BootCamp Recent Software Updates.
Next, onto partitioning the hard drive. Well first, it’s not always necessary to partition your drive. If you have more than one internal hard drive, and want to use it solely for Windows then there is no reason to partition it. Simply format it during the Windows installation. The same thing goes for an external hard drive that you want to use solely to run Windows on your Mac.
If you do want to partition your drive, BootCamp makes it really easy to do. It show two sections on the partitions page, OS X and Windows. Just drag the slider left and right to decide on how much space you want to dedicate to the Windows partition. For a bare minimum you should at least dedicate 20GB. It depends on what you want to do with this partition however. If you’re a gamer and plan on installing many games, you should probably dedicate more that 20GB to Windows. I’d recommend around 60GB-100GB, however it depends entirely on how you plan to use Windows on your Mac.
Once you’ve decided on the amount of space you’d like to dedicate to Windows click the “Install” button. BootCamp Assistant will immediately start partitioning your drive. It usually takes around a minute to complete. Next your Mac will restart. Make sure your Windows install disk is inserted as it will be needed right after the restart.

Installing Windows on a Mac

install windows on a mac reboot windows 7 8
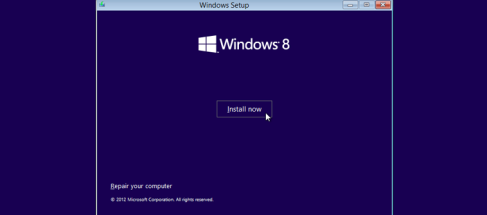
Installing Windows 8
Once your Mac restarts, it will load up the Windows installation files. Be patient, it can take a while, for me it took around 3 – 4 minutes. Once the install files are booted up, the first thing you’ll have to do is agree to the terms and conditions, after reading the 25 page policy of course…
Next, you’ll be presented with two options, Upgrade or Custom. ChooseCustom: Install Windows only (Advanced).
In the next screen all the partitions on your Mac will be shown. If you used BootCamp the drive will be named BOOTCAMP. Select the drive that you’re going to install Windows on, double-check to make sure it’s the correct drive. Windows will show, “Windows can’t be installed on Drive 0 partition 4″. This is because BootCamp wasn’t able to format the drive to NTFS (this is normal). So we need to format this drive to NTFS, luckily it’s really easy.
After you’ve selected the correct drive, click “Drive options (Advanced)”. A little menu with the option to format will appear. Click on “Format”, once done, click “Delete”. Within a couple of seconds the drive will be formatted to the Windows NTFS format. The partition/drive will now be labelled, “Unallocated”, which is what we want. Now that it’s formatted, all that remains to be done is to simply click the “Next” button and Windows will start to be installed.
The entire process should take about 30-40 minutes on a regular drive, and will automatically restart multiple times during the process.
After it’s all complete and you’ve setup your user account (Windows will walk you through it), the BootCamp support drivers will need to be installed. Simply use the support software downloaded earlier or download it now from the Apple website and install it.

Install Windows on a Mac without BootCamp

format and partition windows on a mac without bootcamp
Partition or Format
Installing Windows on a Mac without BootCamp is pretty much the same thing as installing it with BootCamp. For instance, the only thing BootCamp really did was download the support drivers and then partition the drive.
To do it without BootCamp simply open Disk Utility and select the drive you want to partition. Once selected, click the partition tab and then the little “+” symbol. Decide on the size of the partition, give it a name and choose a format. I suggest MS-DOS (FAT), however it doesn’t really matter as you are going to format it to NTFS later on when going through the Windows install process. Next simply restart your computer with the Windows installation disk inserted.
If Windows does not automatically start up when you restart your computer hold down the “Options” key when your Mac restarts/starts up. This will bring into view all the media attached to your Mac. Simply select the Windows installation disk and off you go.

Read more...
Write by rohit-mahatara.blogspot.com | 1 comments

Bootable windows USB on OS X YOSEMITE using Bootcamp

If you are missing option for creation of bootable windows usb in bootcamp assistant, there is a little trick for you. There is hidden option for it. 
Here are steps: 1. Go to applications, utilities and locate bootcamp assistant 2. Click on it with right mouse button and choose show package content 3. Go to content folder and make copy of info.plist file 4. Open it, and locate the right line, delete PRE 5. Save it, and copy back, type administrator password 6. Run Terminal and put this command sudo codesign -fs - /Applications/Utilities/Boot\ Camp\ Assistant.app (maybe there will come Command Tools install window, proceed it.)
Enjoy!


Read more...
Write by rohit-mahatara.blogspot.com | 1 comments

Natively Running Windows 7 on Acer C7 Chromebook 2


Read more...
Write by rohit-mahatara.blogspot.com | 0 comments

How to install windows 8 or 7 on a Mac via bootcamp using a USB


Read more...
Write by rohit-mahatara.blogspot.com | 0 comments

Basic knowledge: the color of the power cable definition for PC

Power is the heart of the computer, Provide energy for the stability of the computer work. The power cable usual include: Yellow, red, orange, purple, blue, white, grey, green, black. nine kinds of color (some powers do not need white cable). So, what meaning are the colors ?
Yellow cable: +12V   It is for Hard drive, cd-rom, ISA slot or cpu etc.
Red cable: +5V  It is for CPU, PCI, AGP, PCI-E, ISA slot etc.
Orange cable: +3.3V   It is for memory.
Purple cable: +5VSB  It is on standby power supply.
Blue cable: -12V
White cable: -5V
Green cable: P-ON  It controls the power switch, when the port signal level is greater than 1.8V, the main power is off; when the port signal level is below 1.8V, the main power will work. If you make a short circuit between green cable and black cable, the power will work, if the power does not work, then it was damaged.
power signal cable.  Usaul it output greater than 2V, the power is good. if it output less than 1V, then the power is bad.
Black cable: GND
Read more...
Write by rohit-mahatara.blogspot.com | 0 comments

Install OS X Mountain Lion from USB Flash drive


Step 1 of 3 – Preparation

os x mountain lion show package contents
Show Package Contents
Firstly you actually have to have the OS X Mountain Lion install app downloaded, you can purchase it from the Mac App Store. Once Mountain Lion has been downloaded, you’ll be able to find it in your Applications folder.
If the downloaded Mountain Lion app automatically pops up after downloading, don’t install it yet, just close the window. What we’re looking for is a DMG file. Go to your Applications folder and locate the “Install OS X Mountain Lion” app.  Right click it and select “Show Package Contents”. Once opened there’ll be a folder called “Contents”, open it, and finally open the “SharedSupport” folder. Inside this folder there should be 2 files, one called “InstallESD.dmg” and the other “OSInstall.mpkg”, copy the InstallESD.dmg to the Desktop. This will be the file that we’ll be using to create the bootable disk image onto the USB Flash drive.

Step 2 of 3 – Prepare the USB Flash drive

how do i install mac os x mountain lion from usb flash drive pen drive firewire
Format USB drive
To create the bootable disk image, your UBS drive has to have at least 8GB of storage. Nowadays USB Flash drive are really cheap and can be purchased at almost any electronics store (the Flash drive I use is 16GB and only cost $15). Plug it into your Mac, and launch Disk Utility (located in Applications/Utilities). We’re going to format the USB drive, so make sure there isn’t anything on it that you need, as formatting will erase everything on the USB drive.
Select the USB drive that is to be formatted, then select the Erase tab. Under the selection for “Format:” select “Mac OS Extended (Journaled)“, and name it anything you’d like. It would probably would be best however to make it something recognizable like “Mac Install” or “Mountain Lion Installer”. Up to you though. Then simply press the “Erase…” button on the bottom right when done. The USB Flash drive will then start to format; in most cases it takes less than a minute.

If you don’t already have a USB flash drive, or want a USB flash drive that is already compatible with Mac OS X then you can purchase one from the MacMall. It’s a good place to buy Mac friendly stuff. Here’s an affiliate link to a 16GB USB drive that comes already properly formatted for the purpose of installing Mac OS X:

Step 3 of 3 – Restore Disk Image

restore disk image usb boot run mac os x
Restore Disk Image
Once your USB flash drive has finished formatting, it’s time to “restore” the drive image. In Disk Utility select the partition that was just formatted and click the restore tab. Make sure to select the partition that you’ve created and not the drive itself. To elaborate, as you can see in the screenshot, I’ve selected the partition I named “Mac OS X Install ESD”, not the drive itself. If you select the drive instead of the partition, then it won’t restore the disk image onto your USB flash drive.
There are two input boxes. One labelled “Source:” the other “Destination:”.
For the “Source:” box either drag the “InstallESD.dmg” file in, or click the “Image…” button, navigate to your desktop and select “InstallESD.dmg”. The destination will be the partition you’ve created. Simply drag the partition that’s on the USB drive that you formatted into the “Destination:” box from the panel on the left of Disk Utility.  Next simply press the “Restore” button on the bottom right.
This could take a while to complete, let it do its thing. Once the process is done, your USB drive is ready to go.
If you want to use the USB to format a new computer or re-format your current computer, there are 2 ways of getting it installed. One is to go to System Preferences -> Startup Disk -> and select the USB drive. This will load up the Mac OS X Mountain Lion installer as soon as you restart your computer. The other method is to simply hold down the Options key on the keyboard when your Mac is just turning on after being shutdown/restarted.
Once it’s done booting into the installer it’s a simple process of going through the provided setup steps.

Read more...
Write by rohit-mahatara.blogspot.com | 0 comments

विण्डोज ८ कसरी ईन्स्टल गर्ने ? -install-windows-8

where-to-install-windows-8
एउटा कम्प्युटरमा विण्डोज ८ ईन्स्टल गर्नु भनेको सहज कार्य हो, जसका लागी माईक्रोसफ्टको ईन्स्टल रुटिनलाई धन्यवाद दिनुपर्छ । केहि कुरा ध्यान दिनु पर्छ यदि तपाई अपग्रेड भर्सन चलाउदै हुनुुहुन्छ, जसले इन सिटु भर्सन विण्डोज ७ लाई ८ मा वदल्छ ।साधारणतया यस्ता अपग्रेडहरु नगर्नु वेस भन्ने सुझाव दिन्छन् । एउटा अपरेडिङ सिस्टम ईन्सटललेस फ्रेस भएको वेलामै गर्न वेस हुन्छ, जसले नचाहिने सामाग्रीहरु भएको पुरानो कम्प्युटरलाई हटाउने बहाना वन्न सक्छ । पहिले सुरु गर्नु भन्दा अघि तपाईले आफ्ना आवश्यक फाईलहरु र एप्लिकेशनहरु व्याकअपमा राख्नुपर्छ । एडोव लाइटरुम जस्ता सफ्टवेयरहरु डि रजिष्टर गर्नुपर्छ । आधुनिक ब्रोजर मुखी कम्प्युटिङ् र क्लाउड स्टोरेजले गरेर आजभोली व्याकअप गर्न सहज भएको छ । त्यसको प्रयोग गर्न सक्नुहुन्छ ।
तपाईको हार्डवेयरलाई चाहिने सम्पुर्ण ड्राईभहरु म्यानुफ्याक्चरको बेवसाईटवाट डाउनलोड गरेर युएसवी फ्लास ड्रईभरमा सेभ गर्दा राम्रो हुन्छ । तपाईले विण्डोज ८ का लेटेस्ट भर्सन चलाइरहनुभएको छ भने, विण्डोज ७ का ड्राईभरहरुले काम गर्नेछ ।  यदि तपाई डाउनलोड गरेर ईन्स्टल गर्दैहुनुहुन्छ भने तपाईले आफ्नै वुट मिडिया निर्माण गर्नुपर्ने हुन्छ । यसको एक मात्र विकल्प भनेको अपग्रेड भर्सन हो, जुन डाउनलोड र ईन्सटल एकै पल्ट गर्नुपर्छ । यद्धपी हामी तपाईले अपग्रेड आइएसओ फाईल डाउनलोड गर्नुपर्ने रिकमेन्ड गछौ जुन डिभिडीवाट वर्न वा युएसवी फ्लास ड्राईभरमा कपी गर्न मिल्छ ।
यदि तपाईले सफ्टवेयरको रिटेल कपि किन्नुभएको छ भने यो सेक्सन तपाई स्किप गरेर सिधै ईन्सटल इन्ट्राक्सनहरु तर्फ हामफाल्दा हुनेछ । तपाईसगा दुई अप्सनहरु छन्, ईन्टलेशन मिडिया वनाउन एउटा खाली डिभीडी अथवा एउटा युएसवी ड्राईभ । यदि तपाई युएसवी ड्राईभ प्रयोग गर्नेमा हुनुहुन्छ भने ४ जिवी क्षमता भएको आवश्यकता पर्दछ । सफ्टवेयरलाई भित्र हाल्दा त्यो आफै हट्नेछ । त्यसैले त्यसलाई युएसवी पोर्टमा ईन्सर्ट गर्नुपर्छ र तपाईलाई चाहिने कुराहरु सुरुमै कपी गर्नुपर्छ ।
यदि तपाई डिभिडी प्रयोग गदैहुनुहुन्छ भने आफ्नो ड्राइभर खाली डिस्क इन्सर्ट गर्नुहोस् । त्यसपछि विण्डोज ७ युएसवी, डिभिडी डाउनलोड टुल डाउनलोड गर्नुहोस् ।
यस लिकंवाट Download  गर्नुहोस अनि  ईन्सटल गर्नुहोस् ।
सफ्टवेयर रन विण्डोज ८ आईएसओ फाईलमा न्याभिगेट गर्नुहोस । नेक्स्ट गर्नुहोस र डिभीडी वा युएसवी ईन्स्टलेशन मेथोड छान्नुहोस् । यदि डिभिडी क्लिक गर्नुभयो भने तपाईले आफ्नो अप्टिकल ड्राईभमा व्लक डिस्क हाल्नुपर्छ र डिस्क डिटेक्ट भएपछि कपिङ् सुरु गर्नुभन्ने वटम क्लिक गर्नुपर्छ । यदि तपाई कपि गर्दा युएसवी ड्रईभ प्रयोग गदैहुनुहुन्छ भने ड्रपडाउन लिष्टवाट सही कुरा सेलेक्ट गर्ने र बिगिङ कपिङमा क्लिक गर्नुपर्छ । यो प्रक्रिया सकिएपछि तपाईले बुट मिडिया तयार हुन्छ । डिभीडी वा युएसवी डिस्कवाट इन्सटल गरेपनी आफ्नो कम्प्युटरमा ईन्टरनेट कनेक्सन गर्नु पर्नेछ ।
इन्स्टलेसन गाइडका १० स्टेप
स्टेप १
आफ्नो विण्डोज ८ वुट मिडिया, कम्प्युटरमा हाल्नुहोस् र सिस्टम रिस्टाट गर्नुहोस् । तपाइसगा नयाा कम्प्युटर भए तपाईको वायोस वा युइएफआई सोहि मिडियावाट वुट हने सेटिङ मिलाउनुहोस । युृएसवी ड्राइभका लागी यो जेनेरिक युएसवी अप्सन हुनसक्छ । वा तपाईले आफ्नो युएसवी ड्रईभ हार्ड डिस्कको सुचीमा पाउनुहुनेछ । पछिल्लोको लागी ख्याल गर्नुहोला । तपाईको युएसवी ड्राइभ लिष्टको पहिलो स्थानमा छ । केही आधुनिक युएसएफआई मदरवोर्डहरुसगा वुटमेनु हुन्छ । जुन खोलेर युएसवी ड्राइभमा क्लिक गर्नुपर्छ ।
विण्डोज ८ वुट गर्न कुनै कि हिट गर्नुहोस् भनेर एउटा शन्देश आउछा । र तपाईले युएसवी ड्राईभवाट वुट गर्दैहुनुहुन्छ भने त्यो देखिदैन । वुटिङ सम्वन्धी खास जानकारीको लागी आफ्नो मदरवोर्ड वा ल्यापटप म्यानुअलको सहयोग पनि लिन सक्नुहुनेछ ।
स्टप २
जव विण्डोज ८ ईन्सटलेशन स्त्रिन देखिन्छ । सहि भाषा छनोट गर्नुहोस र नेक्स्ट र ईन्स्टलमा क्लिक गर्नुहोस् । आफ्नो लाईसेन्स कि वक्समा इन्टर गर्दै नेक्स्ट गर्नुहोस् र आफ्नो लाइसेन्स टर्मसहरु एग्रि गर्ने टिक वक्समा सेलेक्ट गरेर नेक्स्ट गर्नुहोस् । तपाईले दुईखाले अप्सन देख्नुहुन्छ , अपग्रेड र कस्टप । कस्टप सही छनोट हुनसक्छ र सबै भएपछि नेक्स्ट क्लिक गर्नुहोस् ।
स्टेप ३
विण्डोज ८ ले तपाईको हार्डडिस्क डिटेक्ट गर्नुपर्छ । यदि गरेन भने लोड ड्राइभर बटममा क्लिक गर्नुस र सिडी युएसवी कि सही ड्राइभरसगा इन्सट गनुहोस् । यो तपाईले रेइड प्रयोग गर्दा वा नयाा मदरवोर्ड जसले विण्डोज पहिचान गर्न सकेन । त्यसको लागी मात्र हो । तपाईको पुरानो अपरेटिङ सिस्टममा भएको पार्टिशन सेलेक्ट गरेर एडभान्समा सेलेक्ट गरेर डिलिट गर्नुहोस् । यसरी नै तपाईले अरु नचाहिएका पार्टिसनहरु डिलिट गर्न सक्नुहुनेछ । विण्डोज ८ नयाा वा पुरानो हार्डडिस्कमा ईन्सटल गर्दै हुनुहुन्छ भने अनएलोकेटेड स्पेस अप्सनमा सेलेक्ट गरेर नेक्स्ट गर्नुहोस् । विण्डोजले आफै चाहिने डिस्क पार्टिशनहरु बनाएर ईन्सटलेशन गर्नेछ ।
स्टेप ४
हार्डडिस्कमा कपि भएपछि तपाईको कम्प्युटर रिबुट हुनेछ । यदि युएसवी ड्रईभवाट बुट गर्दैहुनुहुन्छ भने तपाईले ड्राइभ हटाउनुपर्छ । त्यसपछि सेटअप विजाड आउछा । कलर छान्नुहोस् र कम्प्युटरको नाम राख्नुहोस् । नेक्स्ट क्लिक गर्नुहोस् र इन्टरनेट कनेक्ट छैन भने तपाईले सोधिनेछ , कनेक्ट गर्नका लागी । विण्डोज ८ ले तपाई एक्सप्रेस सेटिङ् प्रयोग गर्ने वा कस्टमाइन गर्ने भनेर सोध्नेछ । कस्टमाइजमा क्लिक गर्ने ताकि विण्डोज ८ कसरी आफै सेट अप गर्छ भन्ने छनोट गर्न सक्नुहुन्छ । पहिला तपाईले सेक्युरिटी सेटिङ देख्नुहुनेछ । डिफल्ट अप्सनहरु राम्रा हुन्छन् । नेक्स्टमा क्लिक गर्नुहोस् । त्यहाा तपाईले आइक्रोसफ्टलाई ओआए सम्वन्धी जानकारी वनाउन सक्नुहूनेछ । सफ्टवेयर राम्रो बनाउनका लागी । त्यसपछि तपाइलाई अनलाईन सर्भिसहरु सम्वन्धी सुचना सोधिनेछ । जस्तै समस्याहरुलाई अनलाईन मार्फन समाधान गर्न सकिन्छ ।
स्टेप ५
तपाईले आफ्नो पिसीमा पहुचा राख्न आफ्नो इमेल ठेगाना इन्टर गर्नुहुन्छ । जसले तपाईलाई विण्डोज स्टोरबाट एप्सवाट डाउनलोड गर्न दिनेछ । तपाइले कुनै इमेल ठेगाना हाल्नसक्नुहुन्छ तर तपाईले नयाा पासवर्ड हाल्नुपर्छ र माइक्रोसफ्ट एकाउण्टमा रजिष्टर छैन भने सेक्युरिटी प्रश्नहरु सेटप गर्नुपर्छ । विजार्डलाई पछ्याएर एकाउण्ट कन्फिगर गर्ने र तपाईको कम्प्युटर पहिलो पल्ट खुल्नेछ । आफ्नो नयाा एकाउण्ट डिटेल्स हालेर लगईन गर्ने ।
स्टेप ६
विण्डोज अहिले चलेपनी अरु आवश्यक ड्राइभरहरु इन्स्टल गर्ने । पहिलो ड्रईभर चाहिने भनेको मदरबोर्डको । यदि पहिले नै डाउनलोड गर्नुभएको छ भने युएसबी डाइभ वा डिक्स इन्सटल गर्नुहोस् । यदि यो गर्न सक्नुभएन भने मदरबोर्ड साग आएको डाइभर इन्सटल गर्नुहोस् र अनस्क्रन निर्देशनहरु फ्लो गर्नुहोस् । पछि अपडेटेड डाइभरहरु डाउनलोड गर्नुपर्नेछ ।
प्रत्येक डाउनलोड गरेको डाइभर जोडिएको फाइलसाग रन गर्नुहोस् । चिपसेट डाइभरबाटै सुरु गर्नु उत्तम हुन्छ । यदि विन्डोजले वार्निड सन्देशहरु देखाउाछ भने ओके क्लिक गर्नुहोस् । प्रत्येक डाइभर इन्स्टलेसन पश्चात कम्प्युटर रिस्टार्ट गर्नुहोस् ।
स्टेप ७
विन्डोजले आफ्नो ग्राफिक्स डाइभरहरु तपाइसाग भएको अनबोर्ड कार्डहरुमा इन्स्टल गर्नेछ । विन्डोज चल्न केही समस्या गर्दैन, तर गेमहरु राम्ररी खेल्न पाउनुहुन्न । यसको लागि तपाइले लेटेस्ट ग्राफिक्स डाइभरहरु इन्स्टल गर्नुपर्दछ । दुवै एएमडि (ब्:म्० र एनमिडिया ९ल्खष्मष्ब० हरुले एउटा डाइभर दिन्छ, त्यसैले डाउनलोड गरेको फाईल रन गर्नुहोस् । अगाडी ड्राईभरहरु डाउनलोड गर्न सक्नुभएको थिएन भने अहिल्ये नै गर्न सक्नुहुन्छ । ग्राफिक्स ड्राईभर ईन्सटल भएपछि कम्प्युटर रिस्टाट गर्नुहोस । डेक्सटपमा राइट क्लिक गर्नुहोस् स्त्रिन रिजोलुशन छान्नुहोस् र मनिटरको आफ्नो रिजोलुसनसगा म्याच गरेर एडजस्ट गर्नुहोस् ।
स्टेप ८
आफ्नो पिसीसगा जोडिएको अरु प्रोगामहरु ईन्सटल गर्न सकिन्छ । आफ्नो मदरवोर्डमा प्लग्ड भएको डिभाईसहरुको ड्राइभर फाईलहरु ईन्सटल गर्नुहोस् युएसवी डिभाईसहरुका लागी ड्राइभर फाइल सुरुमा इन्सटल गर्नुपर्छ र आवश्यकता अनुसार डिभाइसलाई युएसवी पोर्टसगा कनेक्ट गर्नुपर्छ । यदि कुनै शकांमा भए पेरिफेरलसगा आएको म्यानुअल पढ्नुपर्छ ।
स्टेप ९
विण्डोज ८ को इन्स्टल रुटिनले इन्स्टल अपडेट अटोमेटिकल्ली भनेर व्यवस्था गरेको छ । यसलाई परिवर्तन गर्न विण्डोज एक्समा प्रेस गर्ने र कन्ट्रोल प्यानल सेलेक्ट गर्ने । सर्चवारमा विण्डोज अपडेट टाईप गर्ने र विण्डोज अपडेटमा क्लिक गर्ने । चेन्ज सेटिङमा क्लिक गर्ने , ड्रपडाउन मेनुमा प्रयोग गर्ने र चेक फर अपडेट्स वटलेटमी छनोट ह्वेन टु डाउनलोड एण्ड इन्स्टल देयुमा सेलेक्ट गर्ने ।
तपाईलाई पायक पर्ने वेलामा अपडेट गर्ने यदि छनोट सहज हुन्छ । तपाईलाई सहज लाग्ने अरु कुनै छनोट पनी छान्न सक्नुहुन्छ । डनभएपछि ओकेमा क्लिक गर्नुहोस् । विण्डोज कि प्रेस गरेर विण्डोज अपडेट क्लिक गर्नुहोस् । लेटेस्ट अपडेटहरु इन्स्टल गर्न इन्स्टलमा क्लिक गर्नुहोस् र आफ्नो कम्प्युटर अपटु डेट छ छैन त्यो पनी ख्याल गर्नुहोस् ।
स्टेप १०
विण्डोज ८ को एउटा अप्सन छ जसले रिकोभरी ड्राइभ वनाउन दिन्छ । जसवाट कम्प्युटर समस्या केहि भए प्रयोग गर्न मिल्छ । विण्डोज कि प्रेस गरेर रिकोभरी टाइप गर्ने,सेटिङमा क्लिक गर्ने र क्रियट अ रिकोभरी डिस्क मा क्लिक गर्ने । नेक्स्ट क्लिक गने र २५६ एमवी भन्दा माथिको युएसवी फ्लास डिस्क इन्स्टल गर्ने र लिष्टवाट त्यो डिस्क सेलेक्ट गर्ने , ड्रइभ लेटर प्रयोग गर्दे । नेक्स्ट क्लिक गर्ने र एउटा शन्देश आउछ जहाा ड्राइभमा भएको सवै मेटिन्छ भनेर देखिन्छ । त्यसपछि क्रिएटमा जाने केहि समय पर्खन पर्छ । डन भएपछि अत्यत्मा फिनिष्ट क्लिक गर्ने र युएसवी ड्राइभ सुरक्षित राख्ने ।
Read more...
Write by rohit-mahatara.blogspot.com | 0 comments

How to install MAC OS

Computer Requirements
You need a computer with Windows to run Mac OS X on Windows (of course). The "System Type" of your copy of Windows needs to be 64-bit, because OS X Mountain Lion is a 64-bit operating system. If you have a 32-bit copy of Windows, you can only install Mac OS X Snow Leopard on Virtualbox. You will need at least 4 GB of RAM and a dual-core (two core) processor or better. Personally, the computer I was using for this had a 4-core processor and 12 GB RAM, which is way more than enough. You also need about 10 GB of unused hard drive space.

Right click on "My Computer" on your desktop and click "Properties" to check the stats on your computer. If it doesn't directly tell you how many cores your processor has, look up your processor model on Wikipedia or Google. You also want to find out whether your processor is made by "Intel" or "AMD". Computers with AMD processors will not work with Mountain Lion. 

General Requirements
  • Virtualbox : This virtualization suite is free, and though it doesn't offer official support for Mac OS X, it works well enough.

  • Mountain Lion bootable DVD : Unfortunately, the standard method for installing OS X Mountain Lion on PCs(which uses a paid copy of the Mountain Lion installer) doesn't work with Virtualbox. Instead, you'll have to rely on pirated "bootable DVD" copies of Mountain Lion, also known as "distros". I won't go into details, but you can download these copies from about any bittorrent website by using a bittorrent client (it's about 4.5 GB in size). In the past, we've used the iAtkos distro for this, but iAtkos hasn't updated for Mountain Lion yet, so I used the "OS X 10.8 Mountain Lion bootable DVD for Intel PCs", by Olarila.

  • Hackboot 1 / Hackboot 2: Even though it's called a "bootable DVD", the Olarila version of OS X Mountain Lion still can't boot in Virtualbox by itself. To help Mountain Lion start, you'll need to use Olarila's Hackboot CD. There are three different versions of Hackboot; we'll need to use two of them in this guide. "Hackboot 1" is for starting the Mountain Lion installer, while "Hackboot" 2 is for starting Mountain Lion itself.

  • Multibeast 4.6.1 : You will need to use Multibeast 4.6.1, our favorite Hackintosh post-installation tool, to set up the Mountain Lion virtual machine after the initial installation. While Multibeast 4.6.1 is an old version designed for Mac OS X Lion instead of Mountain Lion, in our case, it actually works better than newer versions of Multibeast. Registration is required on the tonymacx86 website to download this.

Step 1: Prep
Download Virtualbox, install it, and open it up. Also, if you want to be able to view USB devices from your OS X Mountain Lion virtual machine, download the Virtualbox Extension Pack and run it before going to Step 2.

Step 2: Create a new virtual machine.
Virtualbox lets you run Mac OSX within Windows by creating a virtual machine, which is a program that simulates a normal computer.  To create a virtual machine, open up Virtualbox and click "New" on the upper left. Give your new virtual machine a name, and choose "Mac OS X" for the OS Type.

If your version of Virtualbox asks you to choose between 64-bit and 32-bit, be sure to choose 64-bit. Choosing 32-bit will result in a critical "Guru Meditation" error later on.
I recommend assigning 4 GB of RAM to the virtual machine, but you can assign as little as 2 GB of RAM. Every time you turn on Mac OS X, that RAM that you assign here will be used to run the virtual machine. The RAM will be given back to your normal computer after you turn Virtualbox off.

You'll need to create a new hard disk for the virtual machine. Virtualbox will ask you what type of disk you want to create: VDI, VDMK, or VHD. VDI is the original format for Virtualbox, while VDMK is the format used by VMWare. If you're considering getting a copy of VMWare, you might want to choose VDMK. Otherwise, just choose VDI. I recommend creating a dynamically expanding disk; the only other option, fixed-size storage, will eat up your hard drive.

Step 3: Give your new virtual machine an operating system.
Your virtual machine will now be created. But don't stop now--you still need to change a few settings before your machine will actually work. Your new virtual machine will show up on the left column of the Virtualbox start page.  Select your Mac OS X virtual machine (single-click) from the main page of Virtualbox, and open up the virtual machine settings. Once the settings open up, go to "System" and uncheck the "Enable EFI" box. This is by far the most important single setting that you will need to change.

EFI, which stands for Extended Firmware Interface, is a feature that helps operating systems start up. Unfortunately, Mac OSX requires 'speshul' EFI, so the EFI that Virtualbox uses doesn't work.

Once you're done with that, go to the settings for "Storage". In the storage tree box, you'll see a CD icon labeled "Empty". Click on it and click "Choose a virtual CD/DVD disk file". In the window that pops up, choose the .iso file for Hackboot 1 (download below).

DOWNLOAD: Hackboot 1
This way, when your virtual machine starts for the first time, it will boot into Hackboot.

Step 4: Install OS X Mountain Lion
Start up your virtual machine. You will come up to the Hackboot boot screen, with a CD icon labeled "HackBoot" in the middle. Don't do anything yet.

Your mouse cursor will probably be trapped inside the virtual machine. Press the right "Ctrl" key on your keyboard to allow your mouse to escape. Then, at the bottom right of the virtual machine screen, right-click on the little CD icon, and click "Choose a virtual CD/DVD disk file". A Windows Explorer window will pop up; from there, select the OS X 10.8 Mountain Lion bootable DVD.

Click back into the Hackboot screen, and press the "F5" key on your keyboard. This will refresh Hackboot. The CD icon in the middle of the Hackboot screen will now say "OS X Install DVD". Press the enter key on your keyboard. You will then enter the Mac OS X installer page.

Continue, and you will eventually come up to a page that asks you for a "destination" for your Mac install. Oh no, the page is blank! We'll have to fix that. To do this, start up Disk Utility (located under the Utilities menu).

Mac OSX can only be installed on a completely clean disk, so you need to use Disk Utility to wipe your Virtualbox hard disk. Click on the Virtualbox hard disk in Disk Utility and erase it. Don't worry, there's nothing important on it.

On the installation page for Mac OSX, the Virtualbox hard disk should now be showing up. Select it and continue.

Once that's done with, Mac OSX will install itself. This will take at least 20 minutes.

When the installation finishes, Mac OS X will crash into a black screen with white text. This is normal; Mac OS X has installed successfully. Now proceed to the next step.

Step 5: Boot it up
Again, press the right Ctrl key to allow your mouse to escape from the virtual machine screen. Then, click on the CD icon in the bottom right of the virtual machine. This time, choose the .iso file for Hackboot 2 (download below).

DOWNLOAD: Hackboot 2

Restart your virtual machine. You'll see the Hackboot screen once more, except there will be an icon for your virtual machine's hard drive in the middle.

Select it (use the arrow keys on your computer) and press "Enter". Mountain Lion will boot, and you should eventually be led to the Mac OS X setup screen. Fill it out, and you'll finally be led to the Mac OS X desktop.
This concludes the first part of the guide. However, you're not done yet! You still have to make your virtual machine bootable without the help of Hackboot.

Step 6: Fix it up
By default, your ethernet (internet) should work in the virtual machine. However, the virtual machine will not have sound, or be able to boot from the hard drive without help. To fix this, open Safari, and download Multibeast 4.6.1While Multibeast 4.6.1 is an old version designed for Mac OS X Lion instead of Mountain Lion, in our case, it actually works better than newer versions of Multibeast. Registration is required on the tonymacx86 website to download this.

DOWNLOAD: Multibeast 4.6.1

Before starting Multibeast, you have to go the "Security" section of System Preferences in Mac OS X, go to the "General" section, and check "Anywhere" in the "Allow applications" section. Once that's done, run Multibeast and install the following options (contrary to popular belief, you do not need an actual DSDT file to use UserDSDT).

Next, you'll have to delete a certain kext file in your hard drive that causes boot errors. You can do this from Finder, the file browser built into Mac OS X. However, Finder hides your hard drives in Mountain Lion by default. To unhide them, open Finder, and click on File -> Preferences in the menu bar at the top of Mac OS X. Under the "Sidebar" settings, check "Hard disks", so that Finder will display your virtual machine's hard disks in the sidebar.

Then, go to your main hard drive, and go to /System/Library/Extensions. Inside the Extensions folder, delete the fileAppleGraphicsControl.kext.

This completes the post-installation process for your virtual machine. Eject the Hackboot CD; you can do this by right-clicking the CD icon at the bottom right of your virtual machine, and unchecking Hackboot. Then, restart your virtual machine. Mac OS X will now be able to boot normally and play audio. Congratulations!

Step 7: Make the screen bigger
Though this step is optional, I still recommend you do it anyways. Anyways, when you first use your Mac OS X, you'll probably notice one thing: your screen resolution is 1024x768. Since Virtualbox doesn't "technically" support Mac OS X, there's no official way to change this. But here's how you can change it anyways:

Open up Finder and go to the folder "Extra" in the main hard drive, and open the file org.Chameleon.boot.plist. Between <dict> and </dict> in the file, insert the following line.

<key>Graphics Mode</key>
<string>1920x1080x32</string>

You can change "1920x1080x32" to whatever resolution best fits your monitor. For instance, if you want to use the 1600x900 resolution, type in "1600x900x32". Once you've saved it, turn off the virtual machine.

Next, open the Command Prompt in Windows (make sure you are logged into an Administrator account on Windows). You can do this by opening the Start Menu, and typing "command prompt" into the Start Menu search bar. Then, type the following command into the Command Prompt.

cd "C:\Program Files\Oracle\Virtualbox"

This command will change the focus of the Command Prompt to the program folder for Virtualbox (if you installed Virtualbox somewhere different, then change the command to wherever you installed it). Next, type in this command:

vboxmanage setextradata "Name of virtual machine" "CustomVideoMode1" "1920x1080x32"

This command activates "vboxmanage", a command-line program included with Virtualbox that allows you to edit the properties of your virtual machine, including its built-in resolutions. Replace "Name of virtual machine" with the name of your virtual machine-- you can find the name of your virtual machine in the left pane of the Virtualbox main window (in the screenshot below, my virtual machine is named "Mountain Mac 2"). Replace "1920x1080x32" with whatever resolution you're using.

Press the enter key to submit the command. Once that's done, start your virtual machine again. It will now boot in full resolution. Congrats!

Recap
I'll just repeat what I said in my other two Virtualbox guides. Installing Mac OS X on a virtual machine is excellent practice for the real thing: installing Mac OS X on your actual computer. Don't get too comfortable, though. Compared to most computers, Virtualbox virtual machines are very "vanilla", meaning that they're very compatible with Mac OS X in the first place. You can't count on being that lucky with a real PC.
Read more...
Blogger Tips and TricksLatest Tips For BloggersBlogger Tricks

Contact Us

Nepal Laptop Repair
Tebahal-22, Newroad, Kathmandu, Nepal
Phone: +977-01-4244363, +977-9847897410

Nepal Multi Education Institute & IT Solution
Dharmawoti-1, Bagdula, Pulchock
GPO Box No. 22300,
Pyuthan, Nepal
Phone: 977-86-460029, +977-9847907485